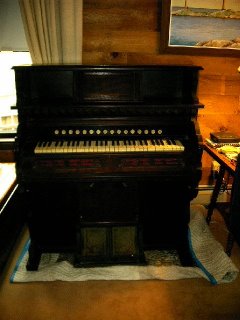


I have no idea how all this will work on the page so please be tolerant! Hmmm, weird layout and I don't know how to rearrange it! Oh well...commentary.... First off is a really lousy picture of the latest reed organ job. I guess I'll have to move it for the final picture when the job is done to see if I can get some better detail definition through better lighting. This is a good sized "Bridgeport" organ (built in Bridgeport, CT in approx. 1889). Written on the key wood (covered over inside when assembled) are two handwritten notations. The first I found says "repaired by Ed Jacobson, January 2005". Sorry Ed, the organ is in rough shape and the only recent repairI could find were new straps for the pedals. So although the pedals *were* repaired, I'm *very* dubious that the organ played - maybe a few squeals if you pumped frantically! The second notation I just loved finding. It says, "tuned by H. S. Thomas, Jan. 22nd /89". It has a really neat personal "logo" under the writing. I'm going to try to imitate the "logo" for my rebuild records.
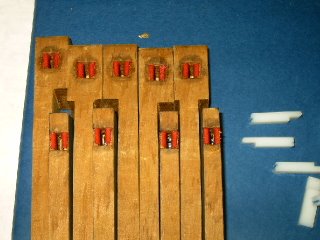
Now the keybushing photos - the top one shows the tiny red wool cloth bushings at the front underside of each key. When the key is depressed when playing the piano it travels on a metal pin, this mortise combined with the pin it rides on keeps the key from slopping side to side. The key will travel absolutely (perceptively) vertically. The second key photo shows the mortise and bushings where the "center" (not really) of the key pivots on another metal pin. So when the front of the key goes down, the back goes up like a seesaw. In this photo the old keytops have been removed and the surface prepped for new tops. Now, in both pics you can see the cauls used as clamps for the new bushings during the time it takes for the hot animal hide glue to dry. The caul size varies depending on what make piano the keys came from. The key pins can range from .087" (old Chickering and others) to .162" (some Steinways). When finished the bushed mortise needs to have approximately .002 - .003 clearance on the pin. So, first I have to remove the old worn out bushings that are allowing the keys to be sloppy and sometimes click against each other and glue in new ones. Don't ask me to try to explain the process for either! LOL I'll just leave it with "precision counts"!
Yes, Ferd, I know it is an over simplified explanation. I'm better at showing how it works than just describing it!
1 comment:
Thanks for the pictures and exlanation of key work I have read it three times and am beginning to get an idea of what you do. Some day I will watch unless the glue gives me a headache. I just invited myself! What nerve. :-)
BTW, if one looks at the first photo without thinking piano keys, it looks like a peice of modern art or a photo of something not keys.. I would love to have a group of people look at it and explain what they see - similiar to the inkblot? Can't spell the name beginning with R.
Anyway, at first glance to me they look like skyscrapers and the white things might be seagulls? Okay, I know I am certifiable.
Post a Comment